• Skip to main content
  • Skip to primary sidebar
  • Skip to footer

Microsoft Excel Tips and Tricks - Computergaga

  • Home
  • Excel Online Courses
  • Excel Functions List
  • Free Downloads
  • Blog
  • Tutorials
  • About
Home / Office / Using Change Highlighting in Project 2010

Using Change Highlighting in Project 2010

When a change is made to a tasks schedule in Microsoft Project 2010, such as to it’s duration or start date, all the cells in the table that are affected by that change are highlighted with a blue background.

This highlighting of the changed cells brings your attention to what task dates and durations were affected by that scheduling change.

This is a really useful tool, but what if it’s not working? Or maybe you would prefer a different colour to the standard pale blue background?

How to Turn On the Change Highlighting Feature

In Project 2010 the button to turn on the change highlighting is not found on the Ribbon or in the Project options. So to use it we need to add it to the toolbar or Ribbon first. Let’s look at adding it to the Quick Access Toolbar.

  1. Click the Customise Quick Access Toolbar button and select More Commands.
Customise the Quick Access Toolbar

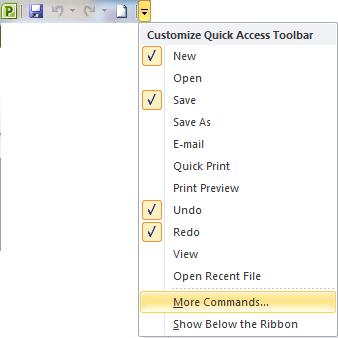
  1. Click the Popular Commands list arrow and select All Commands.
  2. Scroll down the list of commands until you see the Display Change Highlighting command.
Add the Display Change Highlighting button

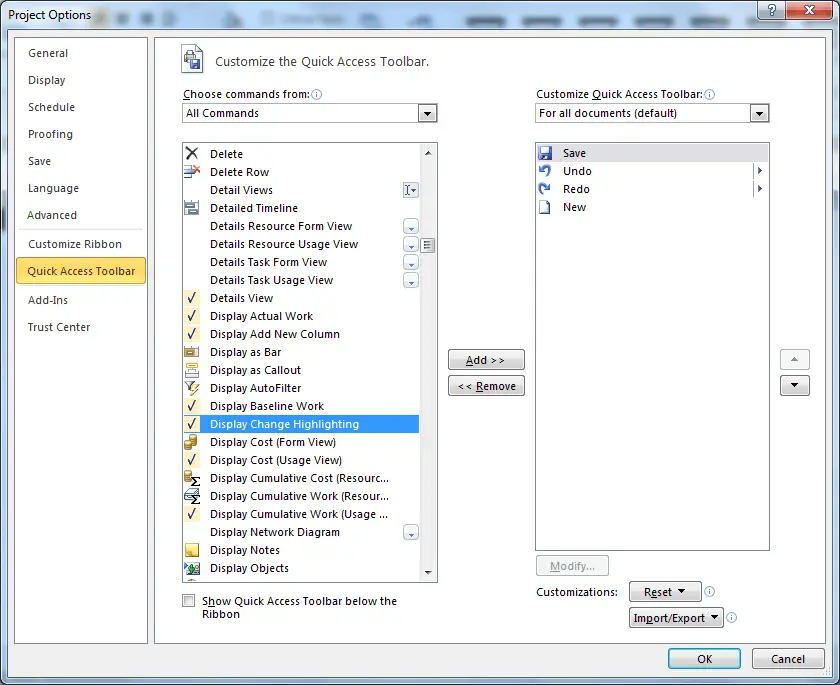
  1. Select the command and click the Add button to move it to the toolbar.
  2. Click Ok.
  3. With the button now added to the toolbar, click the Display Change Highlighting button to turn the feature on or off.

Watch the Video

Change the Colour of the Changed Cells

It is possible to change the colour of the changed cells from the standard pale blue background. This background is not easy to see on some monitors, even in some laptops.

  1. Click the Format tab under Gantt Chart Tools on the Ribbon.
  2. Click the Text Styles button in  the Format group.
  3. Select Changed Cells from the Item to Change list.
Format the changed cells in Project 2010

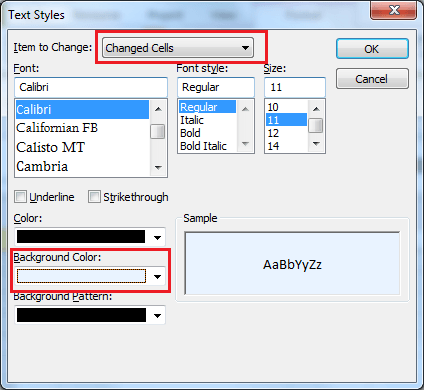
  1. Choose the formatting options of your choice such as the Background Color.
  2. Click Ok and your changes will take effect.

Watch the Video

Reader Interactions

Leave a Reply Cancel reply

Your email address will not be published. Required fields are marked *

Primary Sidebar

Popular Posts

  • Excel Fixtures and League Table Generator
  • 5 Reasons Why your Excel Formula is Not Calculating
  • Excel IF Function Contains Text – A Partial Match in a Cell
  • Excel Formula to Display the Sheet Name in a Cell
  • 4 Alternatives to Nested IF Formulas
  • How to Hyperlink to a Hidden Worksheet in Excel
  • How to Create a Reverse FIND Formula
  • Check if a Value is an Even Number
  • IF Function in Power Query Including Nested IFS
  • Conditional Formatting Multiple Columns – 3 Examples

Recent Posts

  • Excel IMAGE Function – Insert Images from a Cell Value
  • SEQUENCE Function in Excel
  • Sort by Drop Down List in Excel
  • Advanced SUM Function Examples – The Power of SUM
  • Display Negative Time in Excel
Advanced Excel Success book

Footer

Contact

[email protected]

Useful Links

  • Home
  • Excel Online Courses
  • Tutorials
  • Sitemap
  • Privacy Policy
  • Jobs by Jooble

Course Topics

  • Charts
  • Courses
  • Dashboards
  • Downloads
  • Excel Tips
  • Formulas
  • Mail Merge
  • Office
  • PivotTables
  • Power BI
  • Power Pivot
  • Power Query
  • VBA

Join Our Mailing List

© Copyright 2020 Computergaga · All Rights Reserved ·