Mail Merge is, in my opinion, one of the best features of Microsoft Word. It is a hugely popular and powerful tool.
This post will walk through generating a mail merge to produce labels from data stored in an Excel spreadsheet.
- Click the Mailings tab on the Ribbon
- Click Start Mail Merge and select Labels

- The Label Options dialogue box appears. If the label you will be using is not shown either:
- Select the Label vendor and Product number of the labels you will be using from the lists provided
- Click the Details button and enter the measurements of the label you will be using
- Click Ok
An outline of the labels will appear in your document.
Select the Data Source
Next, we will need to select the data source we will be using. This is where all the recipients’ details that our labels require such as name, address etc are stored.
- Click Select Recipients and choose Use Existing List
- The Select Data Source dialogue box appears. Navigate to the Excel spreadsheet where the recipient data is stored and click Open
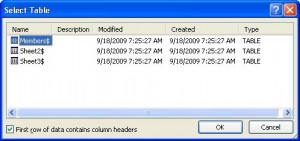
- The Select Table dialogue box appears asking what worksheet of the Excel workbook holds the data you want to use. Select the required sheet and click OK
Insert the Merge Fields
Mail Merge Fields need to be inserted onto the labels to represent the data we would like displayed such as names and addresses.
The fields should be laid out as if you were typing the data onto the label so don’t forget the use of spaces and carriage returns.
To put address onto a label you have 2 choices. You could use the Address Block field or individual Merge Fields.
Address Block – Includes all required address related Mail Merge fields such as Title, First name, Last name, Address1, City and so on. This is quick and easy and makes the process almost effortless.
Insert Merge Fields – Displays all the Mail Merge fields from the spreadsheet. This way takes a little longer but provides you with greater flexibility over presentation.
Let’s use the Address Block;
- Click the Address Block button

- The Insert Address Block dialogue box appears. From here you can select a format for the recipient’s name on the left and see a preview of how your labels currently look on the right
- If there is a problem with the display of one of the address fields, it is probably unmatched. This means Word 2007 has not recognised the heading used in your spreadsheet. Click the Match Fields button, ensure all fields are matched appropriately and click Ok
- Click Ok
- The Address Block field is inserted onto the first labels on the document.
- Click the Update Labels button to repeat the address field on all the labels of your document. Next Record should also be displayed so that each label contains the address of a different recipient from the spreadsheet
The labels can be previewed by clicking the Preview Results button on the Ribbon. This will help identify any potential merge problems before they occur.
Perform the Mail Merge
The final step is to run the Mail Merge to labels.
- Click Finish & Merge button
- Choose whether to Edit Individual Documents or Print Documents
Edit Individual Documents – Produce a new Word document with all the finished labels. This can then be saved and used again in the future without having to perform the mail merge again, or be sent to another location to be printed
Print Documents – Send the mail merge directly to the printer
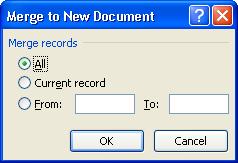
- Select whether you want to merge all the records or a specific range of records from the spreadsheet
- Click Ok
Your mail merge document or print is completed.


Leave a Reply