In this blog post we look at how to create a custom progress bar on a userform using Excel VBA, so that we can see the progress of our macros as they are running.
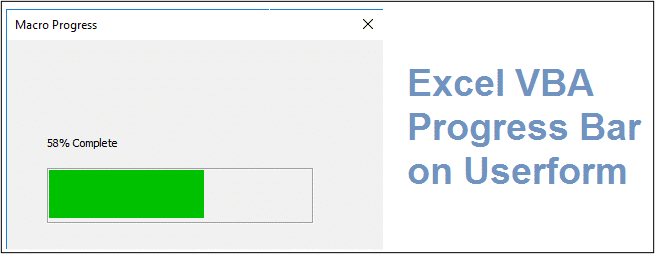
The progress bar will look like the one below. The fonts and colours used can be customised to your own liking.
There is a video at the bottom of this tutorial if you prefer to learn that way. Otherwise lets crack on and create this progress bar.
Download the completed file from this tutorial.
Create the VBA Progress Bar and Userform
The first thing we need to do is create the userform and the progress bar. The userform here will be quite simple, but other control and images could be used on yours.
The Excel VBA progress bar will be made from 3 controls. 1 Frame control and 2 label controls.
The frame will be the border of the Excel VBA progress bar. It is the light grey box you can see above. Then 1 labels will be used for the bar, and another label for the text showing the percentage complete above the bar.
- Switch to the Visual Basic Editor by pressing Alt + F11, or clicking the Developer tab and then Visual Basic.
- Click Insert and then Userform.
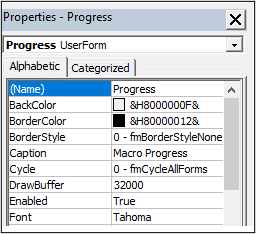
- Using the Properties window (if the Properties window is not shown, click View > Properties Window) enter a name and caption for your userform.
In the image below you can see that my userform is named Progress, and I have used the caption of Macro Progress.
Using the Toolbox, we will now insert the three controls that we need. These controls will also be named using the Properties window for each. The caption has been deleted for each control.
- Click the Frame button on the Toolbox, and click and drag to draw it onto the userform. I have named my frame as Border. I have also enter the Width as 200 (this will be used later).
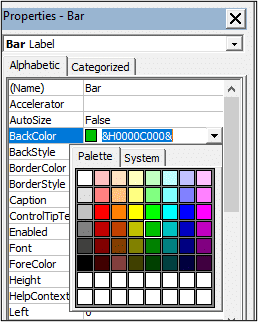
- Click on the Label button and draw that inside the frame. This label will be the bar, so I have named it Bar. Click the BackColor property and select a colour you wish to use for the bar. The palette tab offers a good selection.
- Click the Label button again and draw this one above the progress bar. This one will show the percentage complete, so I have named it Text. I have ensured that it is aligned with the frame below it.
Update the Progress Bar with the Macros Progress
Now that we have the physical bar on the userform (it does not look like much yet) we need it to automatically change width as the macro progresses.
Insert a new code module by clicking Insert > Module.
In this module I entered the following code, which I will explain.
This macro is a simple one that loops through every row of a sheet and multiplies the value in column 10 (column J) by 1.1. We do not care about this, it is just some code to keep the macro busy so we can see the progress bar working correctly.
Sub ProgressBar()
Dim i As Long
Dim TotalRows As Long
Dim CurrentProgress As Double
Dim ProgressPercentage As Double
Dim BarWidth As Long
i = 2
TotalRows = Application.CountA(Range("A:A"))
Call InitProgressBar
Do While i <= TotalRows
Cells(i, 10).Value = Cells(i, 10).Value * 1.1
 CurrentProgress = i / TotalRows
 BarWidth = Progress.Border.Width * CurrentProgress
 ProgressPercentage = Round(CurrentProgress * 100, 0)
 Progress.Bar.Width = BarWidth
 Progress.Text.Caption = ProgressPercentage & "% Complete"
 DoEvents
i = i + 1
Loop
Unload Progress
End Sub
Sub InitProgressBar()
With Progress
.Bar.Width = 0
 .Text.Caption = "0% Complete"
 .Show vbModeless
End With
End Sub
There are two subs here. One called ProgressBar and another called InitProgressBar.
The main sub is ProgressBar and this begins by declaring 3 variables. These are CurrentProgress to be used to calculate the progress through the macro. BarWidth to calculate the width that the progress bar should be at. And ProgressPercentage to store the progress through the macro as a percentage (this is for the Text label above the progress bar).
Dim CurrentProgress As Double
Dim ProgressPercentage As Double
Dim BarWidth As Long
Then before the loop starts we call the InitProgressBar macro.
Call InitProgressBar
This macro is used to initialise the progress bar on the userform. It sets the bar width to 0, the text to 0% and then most importantly shows the userform.
With Progress
.Bar.Width = 0
.Text.Caption = "0% Complete"
.Show vbModeless
End With
The userform is set to be modeless. This means that the user can interact with other parts of the spreadsheet whilst the userform is open. Modal forms do not allow this.
We then calculate the progress through the macro, and what width the progress bar should be at. This is entered inside the loop so after each row of the loop, the user is aware of the macro progress.
CurrentProgress = i / TotalRows
BarWidth = Progress.Border.Width * CurrentProgress
ProgressPercentage = Round(CurrentProgress * 100, 0)
Progress.Bar.Width = BarWidth
Progress.Text.Caption = ProgressPercentage & "% Complete"
The CurrentProgress is calculated by dividing the current row number (i variable) by the total number of rows. There are 12931 rows on this sheet. If you are at row 9523, then you do 9523/12931 which results in 0.736447 through the macro.
Once we know this we can find out what width the progress bar should be by multiplying the width of the border by this value. I set the width of the frame control named Border to 200, so this would be 200 * 0.736447. The answer of 147 is assigned to the BarWidth variable.
We then calculate the progress as a percentage by multiplying the CurrentProgress value by 100. The ROUND function is used to round this figure to 0 decimals. This results is assigned to the ProgressPercentage variable to be used for the Text label.
The width of the progress bar and caption for the text label are then set.
The final bit of code is then the DoEvents statement. This ensures that events can still occur whilst the macro runs.
DoEvents


Leave a Reply